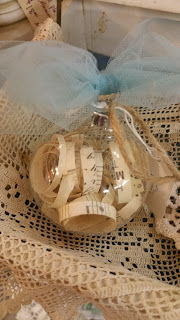
This was such a fun and easy project! I had seen several
pictures on Pinterest using clear glass ornaments filled with various items and
used as ornaments.


Supplies:
Clear glass ornaments (Hobby Lobby, etc.)
Ribbon or Twine
Filler*:
Sheet music, book pages, or other paper
Sand and shells
Glitter
Beads, etc.
*Anything small enough to fit in the ornament opening
One thing to note with the glass ornaments –You
have to remove the top metal portion that has the loop hanger so you can insert
the fillings. Some have very sharp edges or might be slightly broken/chipped at the
very top rim. I cut myself a few times, so be careful!
I knew I wanted to try to make an ornament with sand and
shells and then one with curled sheet music. I gathered my supplies – beach sand
and small shells (you can get all of this at Michael’s, Hobby Lobby or Wal-Mart
too). I also printed a small picture on copy paper that I wanted to put in the
ornament (approximately 2”x 2”). For the curled paper ornaments, I used a
shredder to cut the paper in even sized pieces, but if you don’t have one, you
could use a ruler and rotary cutter or scissors.
Aged Paper - I
printed sheet music found on the internet versus using the originals I had, and also
used an old book from the thrift store. I ran the pages through the shredder
and then wrapped the individual pieces around a pencil to curl the paper
pieces. Depending on how full you want the glass ornament to be, you can curl
anywhere from 10-20 pieces per ornament. I tried to age the paper of the
printed sheet music. To do this, I used a cookie baking sheet, laid the page
flat and poured about a ½ cup of strong coffee on it, covering the paper and
letting it puddle in some places – try not to make it even. Lots of recipes are
out there that vary slightly using tea or instant coffee, etc., just use
whatever you have on hand. To dry the paper, I baked it in the oven on 275 F until it was
dry and the edges begin to curl. If the top of the page seems to dry faster,
you can also flip it over so the bottom will dry more quickly. After the paper dried
in the oven, let it cool for a few minutes and you can run it through the shredder.
Assembly - Once you have all your “ingredients” ready, the next step is
filling the ornaments. Remember to be
careful when removing the metal topper of the ornament, the glass edges might
not be smooth. Not all of them are like this, so when I found one, I set it
aside and filled the other ones first. You can use a funnel to get the sand
inside the ornament, but I didn’t have one and used a rolled sheet of paper instead. Don’t add too much sand or your shells and
other pieces will “sink” and disappear.
I added small shells and bits and pieces I actually found while on
vacation. I added the rolled/curled picture
last, it will uncurl a bit after it is inside the ornament. For the curled sheet music or book paper, I
rolled the individual pieces around a pencil, kept it curled tight and pushed
it through the ornament opening. It will uncurl once inside, then just keep
adding as much as you want.
When you have everything inside that you want, replace the
metal topper. I tied a ribbon, twine,
and tulle in a bow to the loop as a finishing touch.
Hope you enjoyed this little quick and easy project! Thanks and Happy Holidays!!


No comments:
Post a Comment
Thank you so much for your comments! If you have questions please ask - I'm still learning, but will share what I know. Thanks for visiting and again I appreciate your feedback. And please follow me!!